Monday 11 May 2020

Prayer Tower "Minaar" Craft - 30 Day Craft Challenge


Prayer Tower "Minaar" Craft - 30 Day Craft Challenge


Salam craft family! Thanks for joining me for Day 16 of our Craft Challenge. Today's craft was super easy with lots of room for creativity and customization. We talked about the origin of the prayer tower, known as "Minaar" منارة. It is used to notify everybody that it is time for prayers. It is an essential part of every masjid and it is also very beautiful to look at. We went over the Adhaan and Iqamah together and their meanings and then we were ready to make our own Minaar!

This is one of those crafts that can be done easily and swiftly with items you will be able to find around the house. Save your next empty paper tower roll and use it for this purpose. It was also a great way to talk about 3-D shapes - we used the cylinder and cone today! Scroll down to see how we made our very own prayer tower. 

Materials:
  • Cardboard paper towel roll
  • Two sheets of construction paper  (ideally, 2 colours - we used white and green)
  • Tape
  • School glue
  • Sharpie
  • Decoration/stickers - we used adhesive glitter paper
  • Scissors 
    Here's most of what you'll need - I forgot to picture the school glue
Steps:
  1. Use one of your sheets of construction paper to wrap around the roll, tape to secure it.
    We used white for this
  2. On your other sheet, draw a large circle. We used a plastic plate to help us.
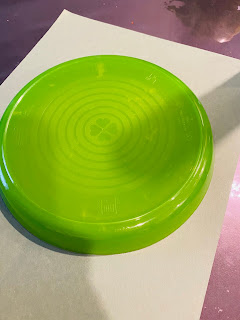
    A perfect circle to work with!
  3. Cut the radius of this circle
    We folded the circle in half two ways to find the centre and then we cut the radius
  4. Wrap it around to make a cone shape and make sure it fits nicely on top of the cylinder, tape it to secure the cone shape. 
    It can easily shape into a cone with some twisting - find the right size for your tower
  5. Use your sharpie to draw the door of your prayer tower. 
    You can do this free-hand
  6. Use your scissors to cut out the top part and then just push it inwards. 
    Don't cut the bottom portion, just push in.
  7. Secure your cone to the top of the tower - we used school glue for this. You may also use tape. 
    Fits nicely!
  8. Decorate your tower - we cut two moon shapes out of adhesive glitter paper and stuck them to the top of the tower - back to back! 
    We free-handed the shape of the moon two times on this sticky paper

    Then we just stuck it back-to-back at the top
  9. Let the creative play being! My children started to teach their Lego toys how to recite the Adhaan. 

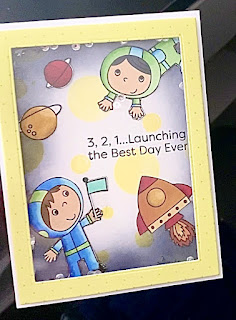
Thanks for taking a look at today's craft! It was an easy activity that was jam-packed with a lot of different lessons. Try it out and leave a comment below! See you next time. 


Saturday 9 May 2020

Pomegranate Painting Craft - 30 Day Craft Challenge


Pomegranate Painting Craft - 30 Day Craft Challenge
Download colouring page here


Salam and welcome to the halfway point of our challenge! We're at Day 15 now and I'm super excited to share what we did today. We focused on the pomegranate today. I talked to the kids about the fact that it has been mentioned several times in the Quran. We also talked about the nutritional benefits of it and that eating pomegranate seeds regularly will keep us healthy and strong!

I designed a colouring page for them and we looked at the word  رمان in the Quran. We also talked about how to pronounce pomegranate in Arabic as seen in the Quran. Once we had our discussion, we tried painting with actual pomegranate seeds and saw how the colour appears on paper. We talked about how this was the method artists used before man-made paints were invented - they were quite fascinated!

Edited to add: No pomegranate seeds were wasted in this experiment - mama volunteered to eat the used seeds!

Materials:
  • Pomegranate colouring page (download here)
  • Colouring Utensils
  • Paintbrushes
  • Pomegranate seeds, about 1 tablespoon
  • Optional: smock - this activity can get a bit messy 
Steps:
  1. Print out the colouring page - I have provided the link above
  2. Have all the utensils available to your child and allow them to get creative! 
  3. Let them use their paintbrushes to spread the pomegranate juice over the colouring page. 
  4. Allow them to see how the pomegranate juice colour changes over time. 
  5. Give them the option of using markers, crayons and pencil crayons to see how they compare. 
  6. Enjoy and repeat as many times as you please! 
I hope you liked today's activity! It's super simple and they are able to learn so much. Please let me know what you think in the comments below! 

Crafting with your Kids - List of 10 Things to have in Stock


Crafting With Kids - 10 Things you should have in Stock

Download this shopping list for your convenience


Salam all! Planning on crafting regularly with your kids? Here is a list of things you should have in stock. Given the current situation with COVID-19, you probably won’t be making regular trips to the dollar store (which is the best place to get all these supplies). It’ll be much more convenient to get everything in one trip. Once you’re well stocked it would be nice to have a crafting box/bin so that you can have all your items conveniently placed.

I have created a list of items that I consider staples to have at home if you want to craft with kids. Crafting is always a great way to engage with children. It also offers something fun to do on rainy/snowy days. So, here we go!

Paper: This item is always in demand in my house. I keep regular printer paper for colouring, printing worksheets etc. I’ve also learned that it's important to have construction paper in stock as well. This gives them a range of colours to work with without breaking the bank. Something that I’ve just recently started to keep in stock is card stock paper. This is a thick, heavy duty paper used for a multitude of crafts. It comes in a range of colours and textures. I always try to have white card stock in storage at my house because it gives structure and strength to a lot of the crafts I want to make with the kids.
These are some of the brands of card stock I've used so far and have loved them!
Stickers: There is always such a huge range of stickers and adhesive decorations at the dollar store, it can often be overwhelming. Steer clear from branded, trademarked characters. Lean more towards generic stickers that can be used to decorate your child's crafts. Examples include, adhesive glitter paper, rhinestone and gem stickers, flower and butterfly stickers, shape sand letter stickers. If you can find adhesive googly eyes - that's a bonus!
These type of stickers are super useful for decorating crafts!

Painting Tools: Painting is such an easy activity to do with our kids - and there is such a range of types of painting! The possibilities are endless. Once you're at the dollar store, be sure to get paintbrushes, paint (poster paint, tempra paint or acrylic paint are all great options). If you're painting with younger children 18 months to 3 years old, be sure to get non-toxic paint that is safe for their fingers. Don't forget to grab a painting palette so that they can freely mix colours. I also found it useful to get smocks for them to protect their clothes while painting. Also, paintbrushes can be used in a range of different crafts that aren't related to painting!
Watercolour paints are also super useful!

Colouring Utensils: This is an important one! Be sure to stock up on markers, crayons and pencil crayons. Kids get excited about colouring when they have a large range of colours to use. I have had bad experiences with getting the dollar store brand of colours. I tend to stick to name brand colours so that they will last longer and will provide bright and vivid colours. My favourites are Crayola and Prismacolor. I also find it useful to have Sharpie markers so that we can write on all different surfaces.
Popsicle Sticks/Craft Sticks: These are also great to have in stock - there's a huge range of crafts you can make with them. There are two sizes that are most useful, as you can see in the picture. It would also be nice to get them in a pack with different colours so that your crafts can be more colourful and vivid.
Such great value when you get them from the dollar store!

Streamers or Wrapping Tissue: It's great to have tissue and streamers in your craft bin. They come in handy with all sorts of crafts, including mosaic crafts! The best part is that they are multi-functional and can also be used to wrap gifts, or for party decor!
These add so much colour and texture to your crafts!

Pipe Cleaners/ Chenille Stems: Pipe cleaners are great to have around in case you want to make a quick craft with your children. These are especially useful if your child likes making animal-themed crafts. Sugar crystals are a huge hit with them as well!
You'll never run out of things to do with these!

School Glue/Glue Sticks and all types of Tape: Don't forget to stock up on these! I definitely undermined the importance of school glue - I have used it so much over the past two weeks. It's also way stronger than I thought - I was able to stick cotton, pompoms, tissue, etc easily to paper. Tape is also a staple - I found packing tape, clear office tape and masking tape to be the most useful.
My personal favourite: School Glue!

Beads: Be sure to stock up on different types of beads! I only have lettered beads in my craft bin but I'm planning on getting a different range of beads as well. Kids enjoy lacing them through string and they can provide excellent sensory experiences for children as well.
My stock is running low, so I will stock up soon!

Yarn or String: Having these items in stock really increases the range of activities you can do with your children. If they are a bit older you can introduce knitting or crochet. If not, you can do beading, weaving and simple sewing as well!
These will add a different dimension to your crafting!
I hope this was helpful to you! If you would like me to add anything please leave a comment below!


Friday 8 May 2020

Celebration Moon and Star Treats - 30 Day Craft Challenge


Celebration Moon and Star Treats - 30 Day Craft Challenge


Salam all! Today was Day 14 of our challenge and it was a nice and relaxing one. We discussed that in the evening we will celebrate the birth of the first grandson of Prophet Muhammad (peace be upon him), Imam Hassan (peace be upon him). We discussed his importance in our faith and how, as his followers, we should rejoice on the occasion of his birth. 

In order to celebrate, we decided to make some special treats together. This was a bit of a change from the type of crafts we have been doing for the past two weeks but the kids welcomed this change. We followed an easy recipe of rice crispy treats, then we cut them in the shape of moons and stars. Scroll down to see how we made this evening extra special!

Materials:
  • Rice crispy recipe of your choice
  • Cookie cutters - we used stars and moons (we used a circle cutter for the moon)
  • Optional: Chocolate chips 
  • A serving plate
  • Tiny mouths to enjoy the treats!
Steps:
  1. Follow your favourite recipe for rice crispy treats. We didn't have marshmallows so we tried something a bit different. We used the following recipe for Vegan Rice Crispy Treats. It was a huge hit with the kids!
  2. Once the treats were nice and firm we used our cookie cutters to make the star and moon shapes
    They enjoyed hearing the crunching sound as they pushed down
  3. After we had our shapes, we set them on a separate plate and topped them with delicious chocolate chips
    This made them super excited about the treat!
  4. Now the hard part, wait for iftaar time before you can devour the treats!
Here was our simple yet satisfying activity for the day. I send all of your many prayers and well wishes on the auspicious occasion of the birth of Imam Hassan (peace be upon him). Hope you all have a lovely time celebrating with your families! See you tomorrow for our next activity!

Thursday 7 May 2020

The Cave of Hira - Paper Mache Craft - 30 Day Craft Challenge


The Cave of Hira - Paper Mache Craft - 30 Day Craft Challenge


Salam and welcome to Day 13 of of this Craft Challenge. Today's craft left the boys in complete wonder and admiration. We discussed how the Quran was revealed to our beloved Prophet Muhammad (peace be upon him). We talked about how he would climb the mountains in Makkah to reach the Cave of Hira. Here, he would pray to Allah and connect with him on a superior level. I shared my personal story of climbing this mountain to reach the Cave of Hira while I was on the pilgrimage of Hajj. I described how physically challenging it was and how much effort it took for just one climb and descent. Then we imagined the troubles our Holy Prophet (peace be upon him) would go through to reach that level on a daily basis. Allah surely appreciated his efforts, and in turn, he revealed the miracle of the Quran upon his heart. 

This craft brought me back to my elementary school days where we would make several different pieces of art using paper mache. It felt nostalgic to me to do this once again after so many years - but I also felt a sense of gratitude that I am now doing this with my own children. Most of you are well aware of the process of paper mache so my steps wont be too detailed. Scroll down and enjoy!

Materials:

  • Paper mache paste - here's a link with details about how to make it yourself: Paper Mache Paste
  • Paintbrush
  • Newspaper cut into strips
  • Scissors
  • Balloon, blown into the size you want your cave to be
  • Bowl sized to hold your balloon in place
  • Paint
  • Sharpie
Watch a fun YouTube video of how we did this activity: Here
Steps:
  1. Place your balloon on top of your bowl so that it is stable 
    The balloon should be snug
  2. Start pasting your newspaper strips onto the balloon
    Be generous with the paste
  3. Keep adding layers of paper mache, feel free to overlap and paste the newspaper strips in different directions to have a sturdy structure
    The newspaper strips will start to stick on nicely once they are wet with the paste
  4. Keep adding strips until you begin to cover the surface of the balloon, keep in mind the lower part of the balloon, which is in the bowl, does not need to be covered.
    Hadi making good progress!
  5. Add 2-3 layers of paper mache until you are satisfied with the coverage. Note that too many layers will take too long to dry. 
    At this point we were satisfied with our work
  6. Set aside to dry - I left ours on a table with a fan running directly at it and it dried within 2-3 hours. If you find that after 3 hours it is still wet you may consider preheating your oven to 200 degrees Fahrenheit then turning it off and placing your semi-dry craft inside the oven. Be sure to pop the balloon before this and place the craft on a cookie sheet or oven safe surface.
  7. Once your craft is completely dry you can remove it from the bowl and pop the balloon (I just used our scissors to do this) - it will slide right out. 
  8. You can now place the craft on a surface and draw the entrance to the cave
    Hadi drew his version of a cave entrance
  9. Use regular craft scissors to cut this shape out
    It's starting to look a lot like a cave now
  10. Use your choice of paint to give the craft a cave look. We didn't have brown or beige so we mixed a whole bunch of colours to come up with this
    All three of my kids were in on this action!
  11. Keep going until you've covered the entire cave
    Finishing up with the painting
  12. This should take about 1-2 hours to dry. Side note: I had so much of this paint left over that I painted some cardboard with the same colour and created a matching surface (completely optional)
    Here it is drying away
  13. Once the cave is dry, we grabbed some pebbles from outside and made a little sign - this gave a neat effect. 

    It ended up looking pretty cool!
  14. Right before bedtime I found some string lights we had in storage and placed them into the cave. The kids were in complete awe! It was really amazing to look at! We might even use this as a night light. 

    Magical!
Many, many thanks for reading our paper mache journey to the very end! I hope you enjoyed reading about this activity. We thoroughly enjoyed every bit of it. Although this was a lengthy craft - it was totally worth it in the end! Please leave a comment below about how you would improve this or if you are willing to try! I love hearing feedback. See you all tomorrow inshaAllah!

The Best Day Ever - Greeting Card