
My Virtue "Merit Badge" Craft - 30 Day Craft Challenge

Salam everyone, it's been a busy few days and I'm playing "catch up" by posting all our crafts from previous days. This craft was from Day 23. We talked about characteristics that would allow us to be good human beings. We discussed what a "virtue" is and how it makes us happy if we are able to reflect these great attributes. We made some badges to represent a few of the virtues that we brainstormed. The boys happily wore the "Merit Badge" of their choice while demonstrating the appropriate characteristics. I needed some help cleaning up our table after the craft was complete and my younger son happily wore his "Helpful" merit badge to help me complete the task!
Try this out with your little ones and see what kinds of virtues they come up with. My older son came up with the virtue, "Beneficent" and said, "Mama, I've heard that this means you want to help benefit others". We gladly made a "Beneficent" merit badge together. Follow the easy steps below to make a few of your own!
Materials:
- A few different colours of construction paper
- Scissors, I also used a paper trimmer but that's optional
- Glue stick or liquid school glue
- Hot glue gun
- Wooden Clothespins
- Markers

What we used for this craft

Check our this YouTube video to see how we did this activity: Here
Steps:
- Cut strips of the construction paper on the long side of your paper (about 2cm in width). You will need about 6-8 strips per merit badge
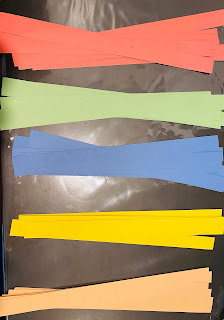
I used a paper trimmer but you can use scissors too - Now begin gluing the strips, one on top of another. Start with an X shape and keep working your way around. Try to distribute the strips as evenly as possible.

Gluing them one on top of the other - Now glue the ends of the strips and stick them on the the centre of your badge, go around in a circle and do this for all the strips

Then sticking the ends to the centre - Once you've glued all the ends - flatten the folds with your fingers and it should appear like the image below.

This is what Hadi's looked like after he was done gluing them all - Cut two wider rectangles of constriction paper and cut out a triangle shape on the bottom

Hadi wanted his to be two different colours - Glue those, one on top of the other, on the back of the badge.

He glued them on the back - Cut a circle shape out of paper - we used white paper for this at least 10-15cm in diameter
- Allow your child to write their favourite virtue on this circle
- Glue the circle on the front of your merit badge.

"Beneficent" got glued to the front - Now, turn on your hot glue gun and use it to glue the wooden clothespin to the back of the badge

Mama assisted with using the glue gun - You should be able to clip it onto your child's shirt safely!

Sticks right to the back - Enjoy practicing all these great virtues!

And then on his shirt!


 |
| Lots of different virtues to work on |
Thanks for joining me once again on this crafting journey! I'm finding it hard to believe that I'm posting my 23rd craft! I really appreciate all your love and support along the way. Leave a comment below to let me know if you're enjoying the crafts.


No comments:
Post a Comment