Showing posts with label Ramadan 30 Day Craft Challenge. Show all posts

Friday 15 May 2020

My Balancing Scale "Al-Mizaan" - 30 Day Craft Challenge

My Balancing Scale "Al-Mizaan" - 30 Day Craft Challenge


Salam! We have now reached Day 21 of our Craft Challenge. Today I wanted to bring up the concept of the "Mizaan" or balancing scale. I found this to be a tough topic for my children to grasp without a visual. Before we did the craft, I spoke to them about the fact that the balancing scale, ميزان, has been mentioned in the Quran with regards to Judgement Day. Allah would like to see us with our scales tipped towards the side of "Good Deeds". We should always strive to attain as many good deeds as we can so that on the Day of Judgement we do not displease our Lord. I got a few nods, but, it wasn't until we constructed this Balancing Scale together that we had our "Aha" moments. 

I have always wanted to make a scale with my children but I always backed away thinking it would be too difficult and would require too much precision for it to be fun. However, I was completely wrong! This craft is so easy and very forgiving in terms of precision. The idea is just to give the kids a hands on opportunity with the scale to really understand how balancing works. Take a look below and you'll see!

Materials:
  • Several pieces of cardboard - I took apart a box. Largest piece was for the base, two small squares for each platform, and two long pieces for the top of the scale
  • One empty paper towel roll
  • Two brass paper fasteners
  • Scissors
  • Pencil
  • String (4 pieces about 60-80cm long each)
  • Ruler
  • Single hole punch (or scissors)
  • Two beads to help balance the scale (seen in images below)
  • Optional: Xacto knife could be helpful but sharp scissors will do just fine as well
    Pretty much all you'll need! Forgot to add a pencil and two beads here
    Check our this YouTube video to see how we made the scale: Here

    Steps:
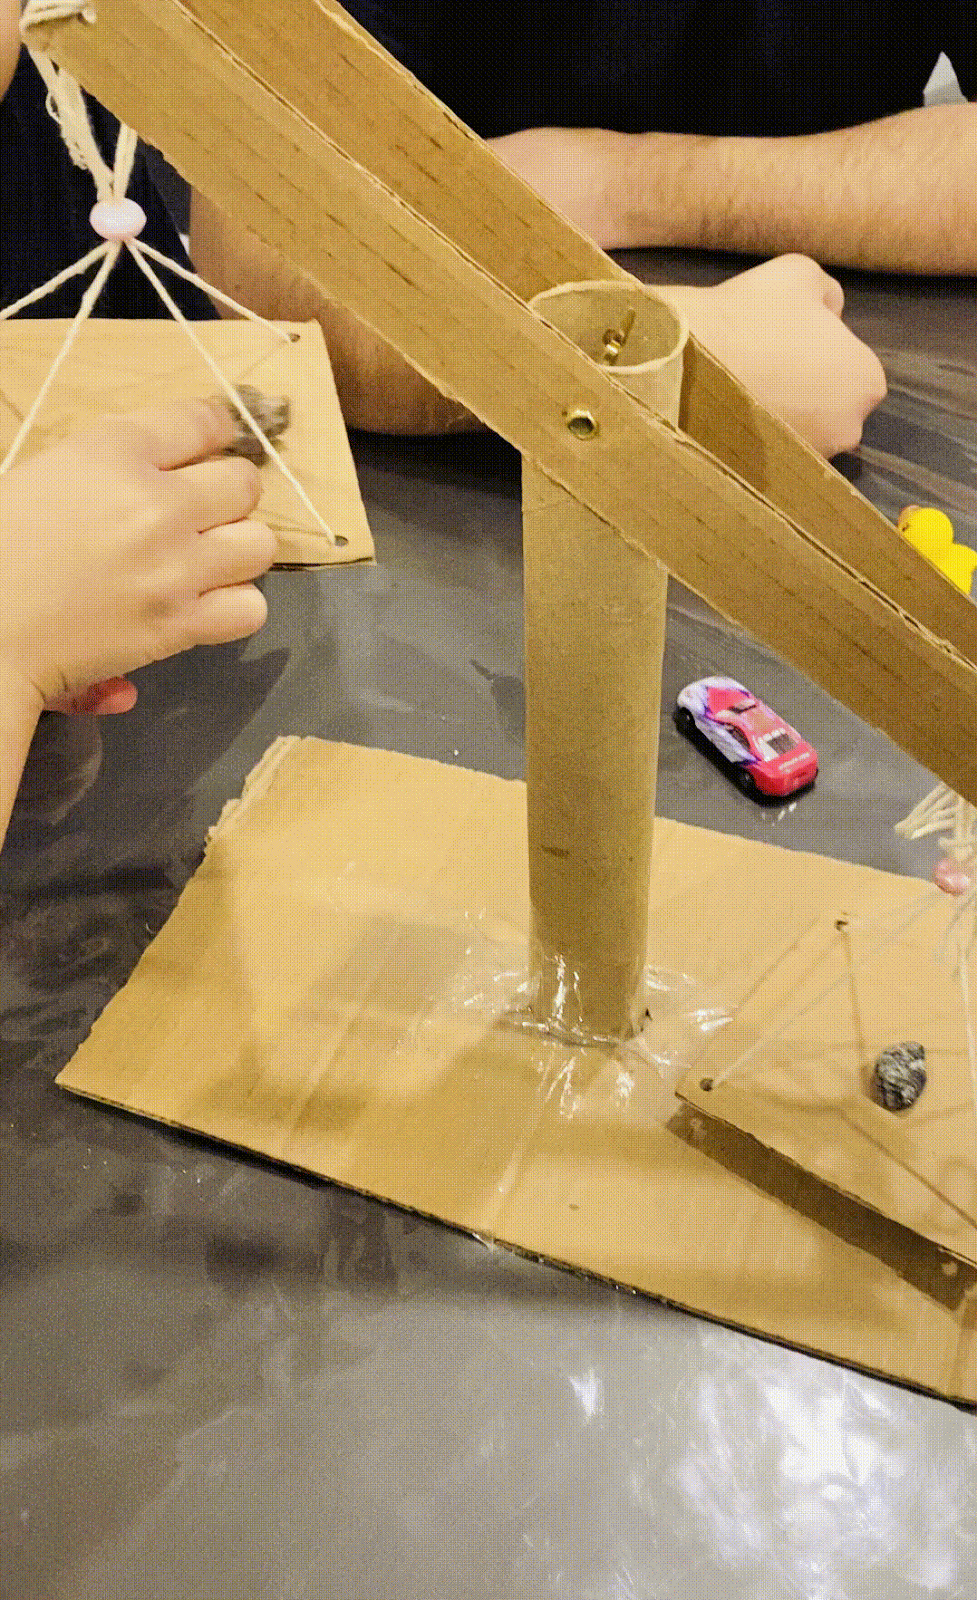
  1. On your base piece of cardboard, right at the centre, use the paper towel roll to trace a circle with your pencil.
  2. Use your Xacto knife or a pair of scissors to cut out this circle
    Here's the circle
  3. Fit your paper towel roll right into that circle
    The roll should fit nice and snug in there
  4. Tape it very well all around
    About 4 or five pieces of tape 
  5. We even put a couple pieces of tape on the bottom 
    Two pieces of tape at the bottom
  6. Use your single hole punch (or scissors) to make a hole right at the centre of each of the long pieces of cardboard for the top of the scale
    Try to measure the centre as best as possible
  7. Then make two holes adjacent to each other on the top of the paper towel roll
    There should be two holes one that visible here and one right behind it
  8. Use your paper fasteners to secure these long pieces of cardboard to the paper towel roll
    They should fasten nicely with enough space to move freely
  9. Make four holes on each corner of your platforms
    The single hole punch came in handy for this craft!
  10. Then make holes on the edges of the top of the scale
    Pictured here are the holes we made at the ends of the long pieces
  11. Get two pieces of string for each platform 
  12. Insert them from the bottom into the holes in the platforms, forming an "X" at the bottom
    This is the X shape at the bottom of each platform
  13. Now pull them up and make sure the length of the string is equal on all sides
  14. String through a bead so that all the string goes through the bead first
  15. Then insert two strings on one side of the top of the scale and two on the other side
  16. Tie them together with a knot
  17. Do the same thing on the other platform
  18. The scale is complete!
  19. Allow your children to place different items in the bases and see which one weighs more
    They measured rocks, toys and fruits!
  20. Make sure to talk to them about always striving to have their good deeds outweigh the bad deeds!
Thanks again for taking a look at this and all the other crafts as part of the Craft Challenge! I appreciate all my visitors. Feel free to leave feedback below in the comments about how I can make this blog better. See you tomorrow!

My "Forgiveness" Snow Globe - 30 Day Craft Challenge


My "Forgiveness" Snow Globe - 30 Day Craft Challenge


Salam and welcome to Day 20 of our Craft Challenge. Today our focus was on the concept of forgiveness. I talked to my children about the fact that we all make mistakes and wrong decisions, but the most important part is that we realize it and ask for forgiveness from Allah. These special nights of Laylatul Qadr are known for seeking and receiving forgiveness. Part of our nightly rituals is saying, "Astaghfilrullah"- meaning I seek forgiveness from Allah. 

Once we seek forgiveness, we are told it is as if the rain has washed them away. This is where the snow globe concept came in. When they shake the snow globe, it begins "raining" and washes away our sins. Now every time they go to play with this craft, they are reminded to say, Astaghfirullah, أَسْتَغْفِرُ ٱللّٰهَ

See how your children can make a "Forgiveness" Snow Globe below!

Materials:
  • A glass or plastic jar 
  • Water
  • Glycerin or Baby Oil
  • Rocks and Marbles
  • Glitter
  • Beads
  • Packing Tape
  • Hot Glue Gun 
Steps:
  1. Collect all the items you want to glue to the base of your snow globe - choose waterproof items 
  2. Plug in the glue gun - be careful when this is around young children
  3. Start gluing your rocks and marbles to the lid of the jar - use extra glue to make sure the items are very secure. Let this dry for at least 2-3 hours. We waited overnight just to be sure. 
  4. Now add the glitter and beads to the jar

  5. Fill the jar with water - leave a bit of space since the items stuck on the lid will take up some space as well 
  6. Add a couple squeezes of the baby oil/glycerin - this will allow the glitter and beads to float slowly
  7. Screw the lid onto the jar
  8. If you want added sealant, use your glue gun to glue all around the closed lid.
  9. We used packing tape to tape all around the lid to make sure there is no leaking 
  10. Now allow your children to shake and enjoy the snow globe! 
Many thanks for staying with the challenge all the way to day 20! I hope you are enjoying the crafts so far. Please leave your feedback in the comments below.

Wednesday 13 May 2020

My Salawat Pillow - 30 Day Craft Challenge

My Salawat Pillow - 30 Day Craft Challenge


Salam all, by the grace of Allah we have made it to Day 19 of the Craft Challenge. I am so blown away by all of your support! Thank you for continuing to follow the challenge and sharing your feedback and inspirational ideas. Today I talked to my kids about the importance of loving Prophet Muhammad (peace be upon him) and those in his household (the Ahlul Bayt). We talked about the many verses in the Quran which emphasize loving and following the Ahlul Bayt. Specifically we went over verse number 56 in Surat al Ahzab (chapter 33), which states, "Surely Allah and His angels send blessings upon the Prophet; O you who believe! call for (Divine) blessings on him and salute him with a (becoming) salutation". After reviewing this verse of the Quran, we began preparing for our craft.

In today's craft we made our very own squishable, huggable, "Salawat Pillow". The idea is, every time they see it, or hug it, they should send one salawat (salutations and blessings upon the Prophet and his family). In Arabic, it appears as, ٱللَّٰهُمَّ صَلِّ عَلَىٰ مُحَمَّدٍ وَعَلَىٰ آلِ مُحَمَّدٍ. 

Again, this craft is a super simple and child friendly activity - no needles involved and no sewing involved! I hope you are able to do this with your children and please let me know how it goes!

Materials:

  • Two square pieces of felt - we used 30cmx30cm 
  • Pencil
  • Fabric Scissors
  • Ruler
  • Permanent markers or Fabric Markers for Decoration
  • Pillow Stuffing 
    Here's what we used to make the Salawat Pillow
Steps:
  1. Fold one of your felt pieces in half and trace a "half-heart" shape with your pencil- try to make it as large as the fabric will allow 
  2. Make a smaller half-heart inside this one - the distance between the two hearts should be at least 5 cm. The larger the distance the easier it is for smaller children to tie knots
    We free-handed the heart drawings
  3. Cut out the larger heart and then use that as a template to cut the heart shape on your other felt piece
    We used the first heart shape to cut the second one
  4. Now you should have two identical heart shapes and a smaller heart shape drawn inside with pencil
    This is what they looked like
  5. Start cutting straight lines approximately 2-3cm apart, stopping where you've drawn your inner circle - some people measure exactly, but we did this free-hand
  6. Do this for both hearts
    We used our fabric scissors to cute these straight lines, we did one heart at a time
  7. Flip your hearts over to the side where the pencil is not visible. Use your pencil to right the word "SALAWAT" on the felt and allow your child to trace these letters with the fabric markers or permanent markers
    Tracing fun!
  8. We did this on both pieces of the fabric - wait a few minutes to make sure this marker dries 
    We were lucky to have bright and vibrant colours
  9. Match the two heart fabrics, one on top of the other - the writing should face outward
  10. Now, start tying knots - one string from one fabric and one string from the other fabric
    Lots of practice with tying knots!
  11. Make sure they are double knots. Do this all the way around and leave about 10cm of space of an opening
    This is the space we used to stuff the pillow
  12. Stuff the pillow stuffing inside the pillow and spread around to make sure its equally stuffed through out the heart shape 
    Stuffing away!
  13. When your satisfied with the appearance of the pillow, tie the remaining knots and close up the pillow 
    We knotted it all the way around!
  14. Allow your child to hug and squeeze the pillow (and recite salawat each time)! 
    So squeezable!
I hope this craft was inspirational for you and your child! May the last 10 nights of Ramadan bring you peace and blessings. And finally, May Allah send peace and blessings upon Prophet Muhammad and his Family. See you all tomorrow!


Tuesday 12 May 2020

Angel Jibreel Delivers a Message - 30 Day Craft Challenge


Angel Jibreel Delivers a Message - 30 Day Craft Challenge

Download Angel Jibreel Template Here


Salam crafters! Tonight I am sharing our craft for Day 18. It comes just in time for the Nights of Power (Laylat-al-Qadr). I talked to my children about the importance of these upcoming nights. They learned that the Holy Quran was revealed to Prophet Muhammad (peace be upon him) on one of these nights. The children asked how Allah communicated with our Prophet during these nights. I clarified that all communication was through Angel Jibreel. This lead us to our craft for the day. 

Today we are making a representation (based on our imagination) of Angel Jibreel. The neat thing about this craft is that it is able to wave its wings up and down. This was surely the highlight for them! I drew a template on paper and scanned it for all of you to use! It works very well with all kinds of paper. I am certain that your children will enjoy creating this craft with you!

Materials:
  • Angel Jibreel Template (download here)
  • Scissors
  • Single Hole Punch - or anything sharp to poke a hole
  • Glue - can be school glue or glue stick
  • Brass plated paper fasteners - these are what I used
  • Optional: decorations such as glitter or stickers 
    This is what we used for our craft today
Watch a YouTube video of this craft Here
Steps:
  1. Print and cut out the shapes in the Angel Jibraeel Template (here) - You can print these directly on to card stock, or just use printer paper. We used our template to trace onto different coloured papers. 
    This is how the pieces will be arranged
  2. Make holes where identified on the templates
  3. Glue hair and face onto the body as shown and glue on the angel ring as well. Allow to dry for a few minutes
    This is how we glued the hair, face and angel ring on the body
  4. Fasten back piece to the wings as shown - be sure that the round portion is at the back as shown
    First fasten the wings to the back peice
  5. Fasten the body of the angel to the wings - be sure that the round portion is at the front as shown
    Then fasten the wings to the body

  6. Hold on to the body of the angel and slide the back piece up and down to see if the wings are able to wave 
    This shows you the front and back of the craft
    Here's how it looks at the back
  7. Decorate the angel if you wish
  8. Allow your child to play with their craft and tell stories of the Night of Power!
    This craft added some inspiration during the Nights of Power

Please keep my family in your prayers during these special nights! I am praying for all of you. I hope that these crafts will provide useful lessons about these nights of Power. See you tomorrow, inshaAllah!

Monday 11 May 2020

The Al-Kawthar River - Sensory Play Bag - 30 Day Craft Challenge


The Al-Kawthar River - Sensory Play Bag - 30 Day Craft Challenge

Download Worksheet Here


Salam and thank you for checking out our Day 17 craft. I'm so honoured to have had the viewership that you all have given me over the past several days. I hope that these crafts are living up to your expectations! Today I talked to my children about Surat al-Kawthar - Surah number 108 in the Holy Quran. It talks about one of the beautiful streams in Paradise that have been promised to our beloved Prophet Muhammad (peace be upon him). It has been described as being a marvelous, stunning and beautiful river in paradise. We recited this Surah together and talked a lot about what it means. I made a handy worksheet for the children to read and get some additional information. 

Once we were done talking, we decided to use our imagination to draw this river in the rectangle provided on the worksheet. There was a lot of excitement and chatter about how they were going to make it extra special. Once they were done with this drawing, we created our own sensory play bag and taped it on top of our river to make it even more unique. In the end, the craft looked absolutely majestic! I hope you can try this activity with your children - I am sure they will enjoy it! Follow the steps below to make your own "Al-Kawthar River Sensory Play Bag".

Materials:
  • Al-Kawthar Worksheet that you can download here - I printed it on card stock for added strength and durability
  • Markers
  • Clear packing tape
  • Beads
  • Glitter
  • Hair gel - dollar store brand that you don't mind using in a craft
  • Snack size ziplock bag - our dimensions were 16.5cmx8.2cm
  • Scissors
     Look at all the colourful and fun items you'll need! 
Watch a YouTube Video of how we did this activity Here
Steps:
  1. Hand out the worksheet to your child and allow them to draw their own version of al-Kawthar river - they can use markers for this. 

  2. Once they are satisfied with their drawing they can fill their ziplock bag with the beads and glitter that they desire. 
  3. Fill about half of the bag with the hair gel. 
  4. Try to release as much air from the bag as possible.
  5. Now seal it shut. 
  6. Use your packing tape to tape over the entire sensory play bag - thus preventing cuts and leaks of the bag - you may use as many layers of tape as you need to feel safe. 

  7. Allow your child to move the glitter and beads around with their fingers and feel the amazement of the al-Kawthar River! 
  8. You may also indulge in the fun!
     
    The proud artist!

Thanks for visiting! I really enjoyed sharing this craft with you all. Please be sure to leave a comment below - I always appreciate feedback. See you all tomorrow!

The Best Day Ever - Greeting Card